-
 Written By Daniel
-
 0 comment
-
 Publish Date : May 17, 2024
-
Last Update : July 27, 2024
-
 11 min read
Are you grappling with the frustration of blurry Instagram reels? Join the ranks of countless users who’ve faced this issue. Instagram Reels Blurry can destroy your creative efforts and leave you wondering what went wrong.
In this guide, we dive deep into the common culprits behind blurry Instagram reels. From insufficient video quality to compression woes, we’ll uncover the reasons behind this phenomenon.
But we won’t stop there- we will equip you with practical solutions to ensure your reels shine with clarity.
Let’s get started on your journey to reel perfection.
Why Are My Instagram Reels Blurry?

Experiencing Instagram Reels Blurry? You are not alone here. Blurriness is a common problem that might be frustrating, especially when you are putting all your efforts into creating engaging content.
The primary reason is often insufficient video quality, resulting in blurry video upon upload. There are several reasons for this, like excessive compression during editing or exporting video, low-quality video, or even shaky camera movement during recording.
To tackle this issue, it’s important to understand these causes and implement an effective solution. By ensuring your videos meet Instagram’s requirements, maintaining high resolution, and avoiding over-compression, you can create crystal clear reels that keep your audience engaged.
Reasons for Blurry Instagram Reels
Understanding the underlying causes behind blurry Instagram reels is the first step to rectifying the issue. Here, we will explore the five primary reasons behind blurry Instagram reels and how to address them effectively.
#1. Poor Lighting
Adequate lighting is a prime factor in video shooting. Videos with poor light can result in dark footage, which then when uploaded to Instagram, results in blurry reels.
To address this issue, consider investing some amount of money in softbox lighting or try filming during daylight hours to ensure a well-distributed and flattering illumination.
A good lighting background will not only enhance the video clarity but also add a professional touch to your video content.
#2. Low Resolution
Resolution is another critical factor in video quality. If your video lacks a high resolution while uploading, it will inevitably appear pixelated when viewed on Instagram.
To emphasize the significance of resolution, consider this: Instagram’s engagement rates for high-resolution videos consistently outperform lower-resolution content.
Recent statistics reveal that videos uploaded at higher resolutions receive 22% more likes and comments, demonstrating that viewers highly appreciate superior visual quality.
To solve this issue, make sure you always record your reels in the highest available resolution on your device. Higher resolution settings offer sharp, crisp visuals that maintain their clarity even after uploading to the platform.
#3. Incorrect aspect ratio
Maintaining the correct aspect ratio is vital for Instagram reels. If you miss shooting the reel in the recommended 9:16 vertical format and use any other format, it will lead to visual distortion and, ultimately, blurriness.
During shooting, it’s important to frame your shots correctly to fit this aspect ratio. Additionally, when editing your reels, double-check that you adhere to the specified dimensions. This meticulous attention to aspect ratio will result in your content in its intended visual appeal and appearing optimally on mobile screens.
#4. Motion blur
Motion blur can significantly affect video clarity, especially when unintended camera movements or swift subject motions come into play. To effectively count this issue, you should incorporate robust stabilization techniques while you are filming your next reel.
Using equipment like tripods, gimbals or handheld stabilizers to guarantee that your shots remain steady and blur-free throughout the filming process.
By minimizing motion blur, you can consistently produce Instagram reels that retain sharpness and visual appeal, even during action-packed sequences.
#5. Problems with the Instagram app
Problems with the Instagram app can unexpectedly alter your reel’s quality during the uploading process, resulting in frustrating blurriness. To solve this, ensure your video adheres to Instagram’s specific requirements regarding format, resolution, and codec.
Furthermore, make sure you always keep your Instagram app updated to access potential bug fixes from the platform that can help preserve the quality of your uploaded content.
Keeping an eye on these technical aspects ensures your reels stay clear and impactful, avoiding unexpected quality issues.
How Can We Fix Instagram Blurry Reels?
Now that we’ve identified the reasons behind blurry Instagram reels, let’s delve into the solutions. Ensuring your reels maintain top-notch clarity requires a combination of techniques and attention to detail.
Source [Trev
#1. Record at High Resolution
Begin by recording your reels at the highest resolution available on your device. Opting for a higher resolution setting guarantees that your videos possess exceptional clarity and detail.
This initial step sets the foundation for visually appealing content that retains its quality during uploading.
Recording in high resolutions preserves all the details, from vibrant colors to fine textures, boosting the overall visual impact and impressing your audience.
Whether showcasing craftsmanship or landscapes, this attention to detail elevates your reel’s professionalism and engagement.
#2. Avoid Compression
When editing and exporting your reel video, avoid excessive video compression, which is crucial for maintaining reel quality.
Excessive compression can result in a noticeable loss of quality, leading to the undesirable outcome of blurry visuals. Striking the right balance between reducing the file size and preserving the sharpness of your content is key.
This ensures that your reels maintain their clarity, effectively engaging your target audience. By actively following this step, you safeguard the visual integrity of your content, leaving a positive and lasting impression on your viewers.
#3. Use Quality Audio
Prioritize great audio and avoid over–compressing your reels while editing. Investing in a quality microphone captures your clear sound while minimizing background noise.
This enhanced, clear, and crisp audio compliments your visuals, leaving a lasting impression on viewers. During the editing or exporting process, be careful not to over-compress, which can lead to noticeable quality loss and undesired blurry visuals.
By prioritizing both audio and video quality, you create and upload high-quality videos that not only look great but also sound professional.
#4. Stabilize Your Camera
Ensuring steady video is essential to prevent motion blur in your reels. Unintended camera movements or rapid subject motions can significantly impact video clarity.
To overcome this issue, consider implementing effective stabilization techniques like tripods or handheld stabilizers to ensure your reel remains steady. This minimizes motion blur, allowing you to create shart and visually captivating Instagram reels, even when capturing action scenes.
A stable camera setup enhances the overall viewer experience and keeps your audience engaged from start to finish.
#5. Adjusting Video Resolution Settings
Before hitting the record button, it’s crucial to maximize your device’s video resolution settings. This straightforward yet important step guarantees precious detail capture and clarity.
Select the highest available resolution option on your device to ensure your camera captures every nuance with precision and fix blurry videos. High-resolution reels translate to engaging and clear Instagram reels, making your content stand out.
Whether you’re showcasing intricate details or breathtaking landscapes, starting with optimal video resolution settings sets the stage for content that not only looks great but also maintains its quality during the uploading process.
#6. Uploading Your Reel at The Right Size
After filming and editing, the final touch is uploading your reel at the correct size. Remember to maintain the 9:16 vertical aspect ratio, as it is Instagram’s preferred format.
This consistency ensures that your content displays optimally on mobile screens, preserving its intended visual impact on overall social media platforms. Starting with the right size guarantees that your reels maintain their clarity and don’t lose quality during the upload process.
Whether your reel is a showcase of intricate craftsmanship or a breathtaking travel adventure, adhering to the correct aspect ratio ensures your content looks as impressive on Instagram as it does on your device.
3 Ways To Avoid Blurry Instagram Reels
In addition to addressing audio and recording considerations, there are practical steps you can take within the Instagram app itself and on your device to ensure you keep uploading high-quality Instagram reels.
Let’s explore these methods that help you sidestep the pitfalls of blurry Instagram content.
#1. Enable High-Quality Uploads
Discover how to enable high-quality uploads within the Instagram app to ensure your reels maintain their clarity and brilliance.
- Step 1. Begin by launching your Instagram app and locate your profile icon, usually situated in the bottom right corner.
- Step 2. Once on your profile page, spot the three horizontal lines at the top right corner. Tap these lines to access the app’s menu.
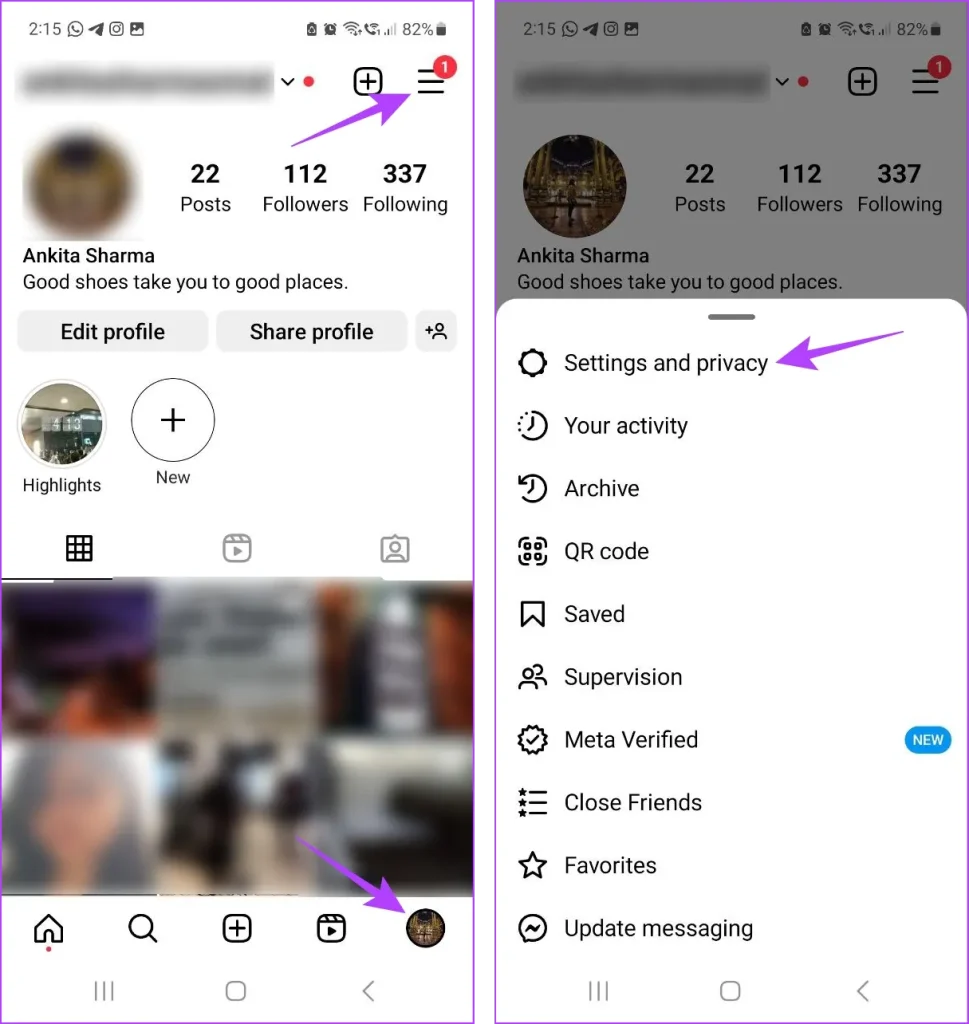
- Step 3. In the menu, scroll down and select “Settings.”
- Step 4. Within the “Settings” menu, you’ll find the “Account” Section.
- Step 5. Under “Account,” navigate to “Cellular Data Use.”
- Step 6. Among the Options, you’ll discover “High-Quality Uploads.” Activate this feature by toggling it on. This will turn off the data saver.

- Step 7. Enabling “High-Quality Uploads” ensures that your reels maintain their crispness and visual quality, even when uploaded via a cellular network internet connection.
By following these comprehensive steps, you guarantee that your reel’s quality is consistently top-notch, delighting your viewers with clear and captivating content.
#2. Turn off Battery Saver for Instagram
By optimizing your device’s battery settings, you can unlock the full potential of your Instagram experience. Here is how to ensure your reels shine brightly.
- Step 1. Begin by accessing the settings on your mobile device, where you can manage your device’s performance.
- Step 2. In the settings menu, navigate to the “Battery” or “Battery saver” section.
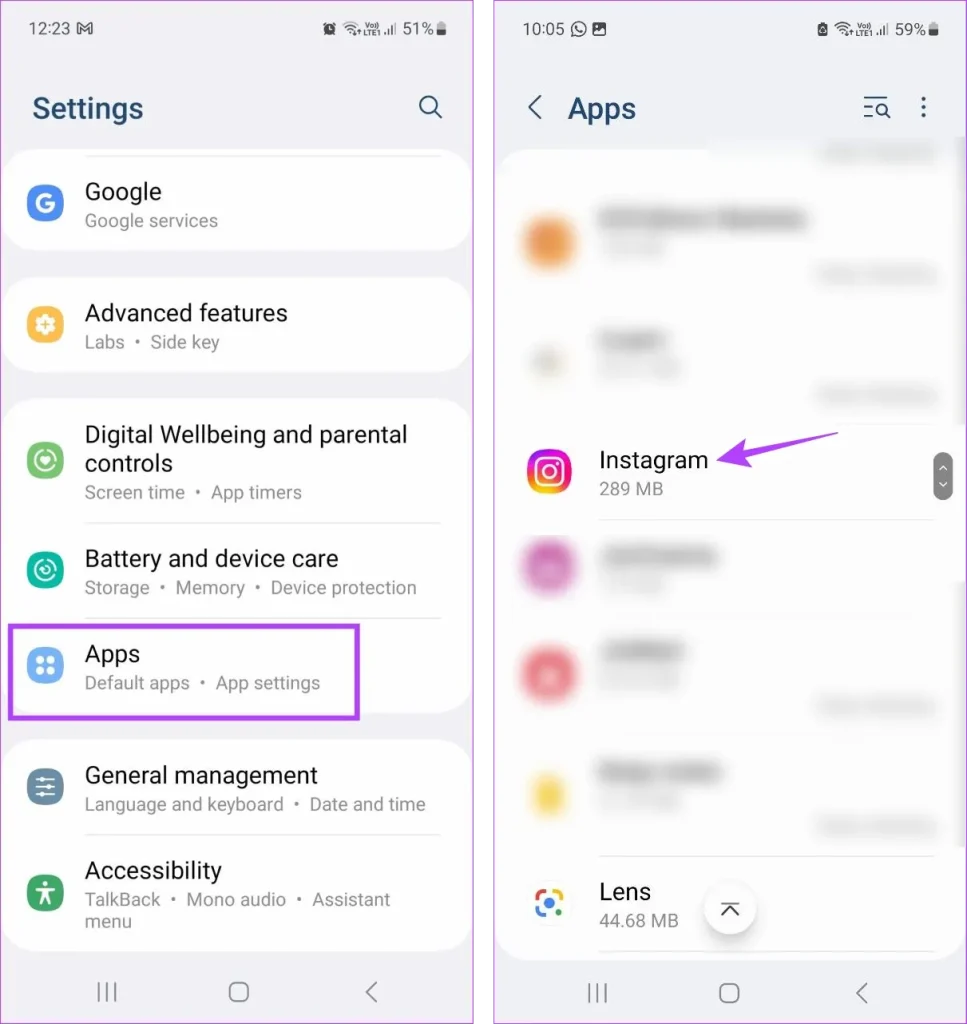
- Step 3. Here you will encounter a list of apps that are subject to battery-saving restrictions.
- Step 4. Within this list, locate and select the Instagram app.
- Step 5. Within Instagram’s settings, you will find an option to disable or turn off the battery-saver or power-saving mode. Activate this option specifically for Instagram.
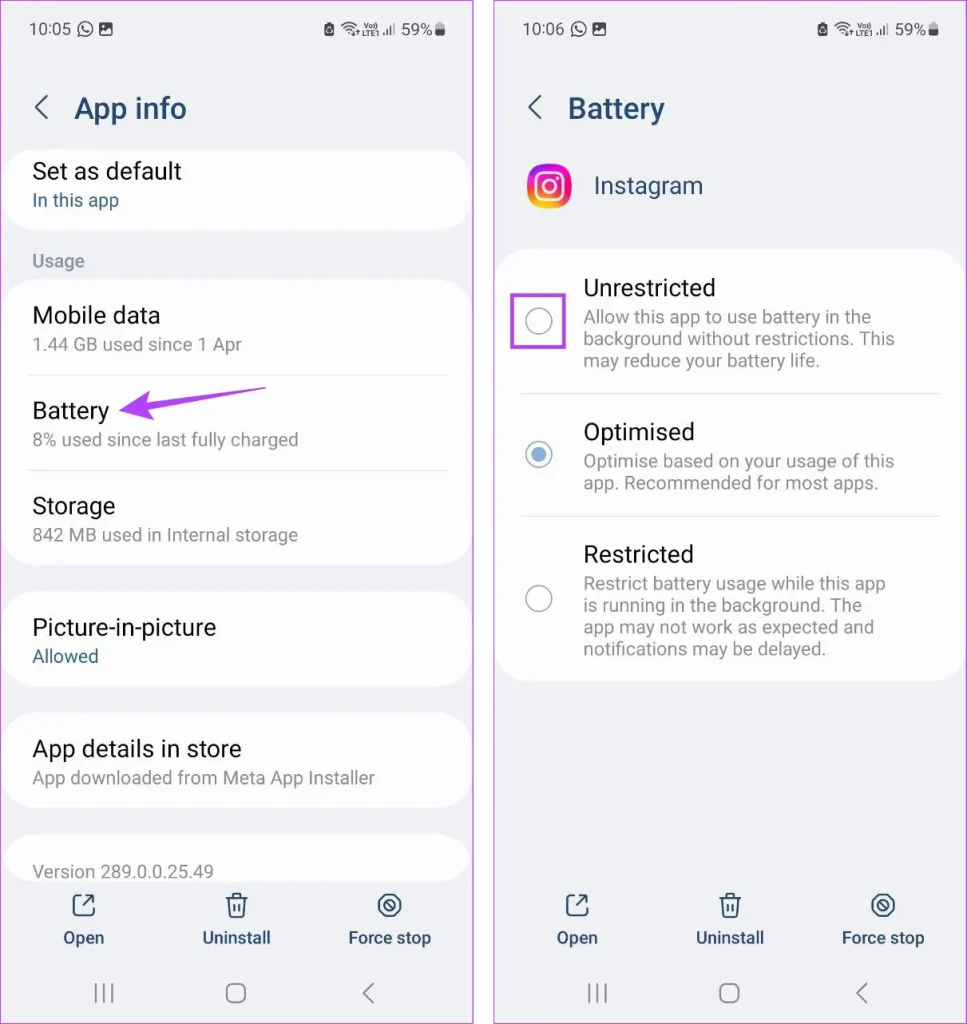
By deactivating battery-saving features for Instagram, you ensure that the app functions without any limitations that could impact the quality of your reels.
#3. Turn off Low Power Mode on iOS
Discover how to enhance your reel’s visual quality on iOS devices by disabling the low-power mode feature.
- Step 1. On your iOS device, open the “Settings” app.
- Step 2. Scroll down and find the “Battery” section.
- Step 3. In the “Battery” section, you’ll see “Low Power Mode” Tap on it.
- Step 4. Toggle off the “Low Power Mode” to deactivate it.
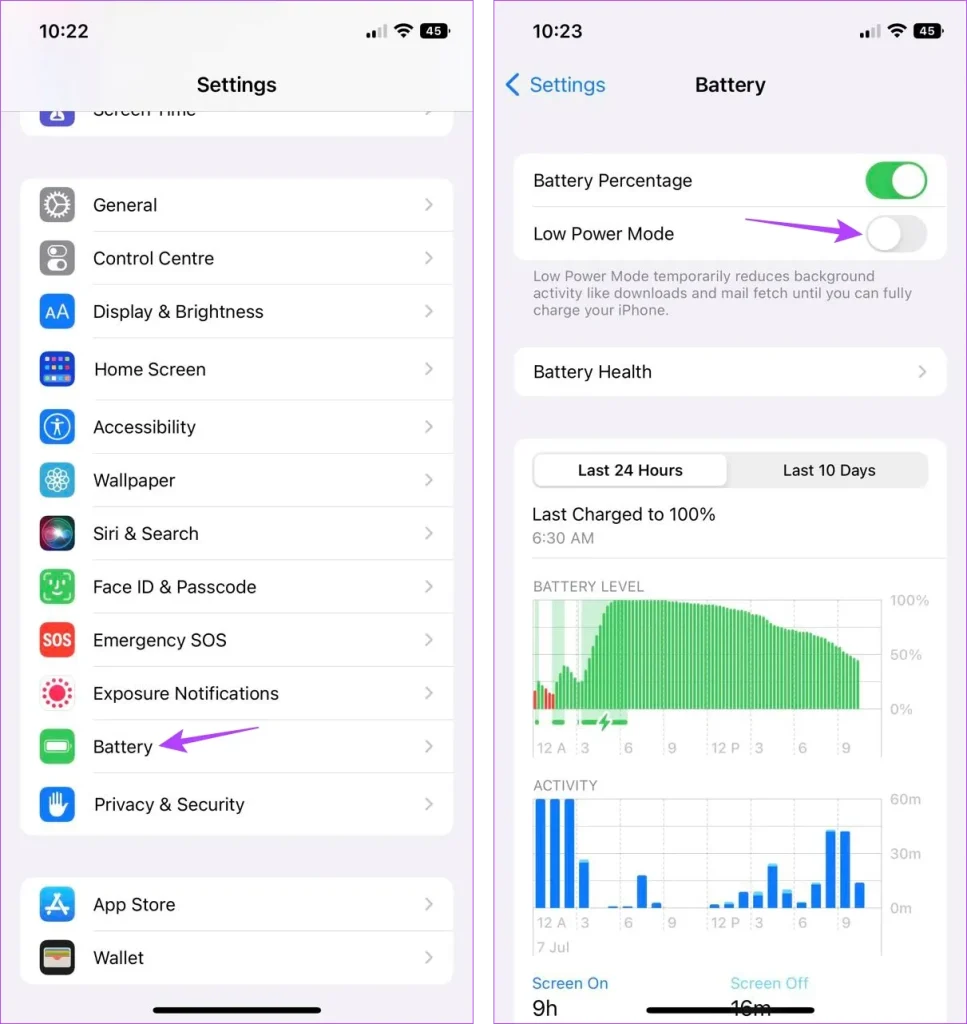
- Step 5. With Low Power Mode turned off, your iOS device will no longer apply power-saving measures that could affect the performance and quality of apps, including Instagram.
These steps ensure that your reels are displayed with the highest possible quality on your iOS device. These actions help you avoid quality compromises or blurry or low-quality reels and ensure that your reels shine brightly in the Instagram landscape..
Source [Build Your Tribe]
Conclusion
In summary, the frustration of blurry Instagram reels often stems from multiple factors. Poor lighting, low resolution, incorrect aspect ratios, motion blur, and device settings can all contribute to this issue.
However, armed with the knowledge of these potential pitfalls and the steps to avoid them, you can create Instagram reels that maintain their clarity and brilliance.
With the above-mentioned strategies in place, blurry Instagram reel issues will be a thing of the past, and your content will captivate viewers with its visual excellence.
Frequently Asked Questions
Even in good lighting conditions, blurry reels can occur due to factors like low-resolution recording, compression during editing, or suboptimal camera settings. To avoid this, ensure your record at the highest resolution available on your device, minimize compression, and maintain good camera stability. These steps help preserve the clarity of your reels, even in excellent lighting.
Maintaining high resolution throughout your reel’s journey is vital. Start by recording at the highest resolution on your device. During editing, avoid excessive compression and prioritize audio quality. Ensure stable camera shots and adhere to the correct aspect ratio. When uploading, choose the right settings for high-quality uploads. This end-to-end approach ensures that your reels remain in high resolution from the beginning to the end.
Here are some tips for achieving the right aspect ratio on your Instagram reels without compressing quality: 1 Frame your shots correctly during filming to fit the 9:16 vertical format 2 When editing your reels, ensure that you maintain the recommended aspect ratio dimensions. 3 Avoid stretching or distorting your content, as this can lead to a loss of quality and clarity. 4 Use editing software that allows you to easily adjust and crop your videos to the correct aspect ratio. 5 Preview your reels before posting to ensure that they appear as intended with no distortion or compromise in quality.
While Instagram provides various features for editing and enhancing your reels, there are no “secret” settings that significantly improve clarity beyond adhering to best practices. The key lies in Recording at high resolution, Avoiding compression, Stabilizing your camera, and Maintaining the correct aspect ratio.
The issue of reels appearing great on your phone but losing quality after uploading can be attributed to compression during the upload process. To prevent this, ensure you’ve recorded at high resolution, avoided excessive compression during editing, and followed the best practices mentioned earlier. Additionally, use the “High-Quality Uploads” option in the Instagram app settings to help maintain the visual quality of your reels during the upload process. This ensures your reels look stunning both on your phone and on Instagram.
In the vast landscape of technology, where innovation and change are the only constants, Daniel emerges as a steadfast guide. His fervor for all things tech is not just a fleeting interest; it’s a deep-seated passion that has been cultivated over many years. This passion, coupled with his extensive experience, positions him as an authority in the digital realm. But what truly distinguishes D...
Read More How To Get Notes In Instagram? [2024]
Instagram Notes is the quickest and most excellent way to share your thoughts with your followers. Instagram has recently added a feature to Instagram that will help you to initiate a conversation and...
Read More
Daniel
 16th May
 How to Get Verified on Instagram? 101 Guide
 How to Add Transitions To Instagram Reels In 2024